Sprouting potatoes before planting: effective methods and recommendations
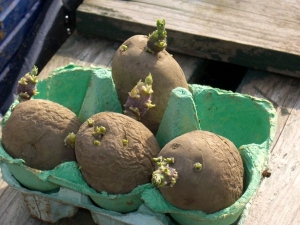
Nowadays, few people grow vegetables in summer cottages and gardens, and fruit trees have replaced ornamental ones. In supermarkets and markets, products can be bought at any time of the year. But there are still lovers to grow crops from seeds and tubers on their plot. They are proud of the result, they worry about every sprout.
In this article, we will talk about how to get a good potato crop and what needs to be done for this. Let's start with the preparation of planting material and learn how to germinate potatoes.

Why do it?
Potatoes can be easily rejected at the germination stage. You will see spoiled or weak planting material. Preparing potatoes in the spring makes it possible to plant only healthy seedlings. Such potatoes will sprout quickly and are guaranteed, there will be no “bald patches” in the rows, the bushes will be strong, and the harvest will be full.
They begin to prepare planting material a little more than a month before planting - about 40 days. The terms in each region of our country are different, they also depend on whether spring is expected early or late.
It is necessary to select potatoes for planting in the fall. It should be even, without damage, its size should be the size of a large chicken egg. If it is larger, it will have to be cut in the spring, but so that sprouts remain on each part. Small potatoes do not have enough food supply to give a full crop.Large tubers wake up for a long time, as a result, few small potatoes grow out of them. In the spring, the prepared material is sorted out, the tubers are rotten and with long thin sprouts (they will break when moved).
Rejecting tubers before planting will help produce quality potatoes and keep the best qualities of this variety.


Basic ways
After the tubers have been sorted, they must be washed well to get rid of dangerous and harmful bacteria that may have survived in the ground. After that, they must be treated with potassium permanganate, boric acid or a purchased special tool for processing and feeding potatoes. Then we dry the root crops and warm them up for several days in a room at a temperature of 21-25 degrees. At that stage, we will see which tubers do not germinate, and we will remove them too.
The next stage in the preparation of planting potatoes is germination. There are several ways to germinate potatoes for planting.
Sprouting potatoes in the light is quite simple and fast. To do this, we put the planting material in transparent plastic bags with holes or wooden, plastic or cardboard boxes. You can use three-liter jars, the neck of which is closed with small plastic bags with small holes previously made in them. We move them to a room illuminated by sunlight. It is desirable that the temperature in it be +20, and after a week we reduce it to +15 degrees. If direct sunlight falls on the potatoes, it is better to shade them slightly with a cloth or paper.


Before planting for 2 days, the planting material is hardened, reducing the temperature in the room to +10 degrees, and closed from the light, which increases the rate of subsequent germination in the ground several times.
In the dark, preparing potatoes for planting is even easier. True, it germinates more slowly, the sprouts will be thin. It is important to ensure that the sprouts do not overgrow. To do this, you will have to reduce the temperature of the room and humidify the air and tubers. The period of germination of potatoes in this way is about 20 days.
It is possible to germinate planting material in a film even in an apartment. You can use ordinary transparent plastic bags for this, only stronger, or bags with handles. Don't forget to make ventilation holes in them. You can put 10-15 potatoes in each. The packages are tied up and hung in a lighted place, avoiding too bright sun. Do not forget to turn the bags over after 2 or 3 days for an even effect on the root crops. This creates a greenhouse effect and planting material will quickly germinate.
It is difficult to germinate a lot of potatoes in this way, it will take a lot of bags and space to hang them. It is necessary to transport the tubers to the landing site in bags carefully, without breaking the sprouts. The disadvantage of the method is also that it will be possible to sort them out only immediately before disembarking.


In boxes, sprouting potatoes using top dressing is, of course, more difficult. But this method gives better quality tubers for planting, they become stronger and germinate faster.
For this method, you can use both boxes and baskets. We cover the bottom with cellophane, and put a small layer of peat, humus, sawdust or straw on top. You can mix them with humus.From above we lay potato tubers in one row, then again the litter, potatoes on top, and so on several layers. We put as many layers as the depth of the container allows. We spill each row of litter with tubers with water. If you water them after laying, the layers may be unevenly moistened.
The temperature in the room where the planting material will be prepared should be constantly in the range from +15 to +17 degrees. After a week, sprouts should appear. If humus has not been added to the boxes (baskets), then pour them not just with water, but with fertilizer. As a top dressing for 10 liters of water, use 10 g of saltpeter, potassium chloride and 50 g of superphosphate. Who prefers not to use mineral fertilizers, use wood ash: a glass of 10 liters of water and a few drops of copper and boron. After two days, top dressing must be repeated.


If everything is done correctly, then after one week the planting material can be planted. With this method of germination, the tubers will have not only sprouts, but also roots. Using this germination method, you will have to green the tubers in the fall before laying them in storage, which will have a better effect on their storage. This method will help protect tubers even from mice.
Germination can be carried out in the garden if there is no room for this. We just have to wait until the snow melts and the temperature outside is not lower than +10 degrees. We also put a dry bedding of peat, sawdust, straw, humus or a mixture of them on the ground, lay one or two layers of dry potatoes on top. We cover everything with cellophane (it will protect the tubers from frost at night) to get the effect of a greenhouse. Using this method, the period of germination of tubers will be from 14 to 21 days, depending on the air temperature.
You can speed up the germination period by this method if you put cow dung under the litter.


In pots, you can germinate potatoes in the apartment, if you plan to plant it a little. To do this, the tubers are kept in a box with moistened sawdust for a week. Then they are laid out in pots (preferably clay) with fertilized soil. Keep the soil moist and use a mineral or gummed fertilizer when watering. If the air temperature outside the window is more than +10 degrees, take the pots out to the balcony for hardening at night.
Potato seedlings are planted in warm soil when late frosts are no longer expected.
You can also germinate potatoes in bottles. In plastic containers with a volume of 1.5, 2 liters, the narrow neck is removed, holes are made in the bottom. We pour soil with added mineral fertilizers (nitrogen, phosphorus and potash) into the prepared container, put one tuber, fill it up and water it well. We place the bottles on the windowsill, where the temperature should be between 15-17 degrees. Don't forget to keep the soil moist.


In a heated greenhouse, it is very easy to prepare potato tubers for planting by sprouting. Arrange the tubers on an unoccupied garden bed or other flat area in a single layer. Thanks to lighting, the same temperature and humidity, strong sprouts will appear in 10, maximum 12 days. Turn the tubers periodically for uniform germination.
The method of drying and heating is used when there is not enough time to use other methods. It allows you to awaken the eyes of the tubers. To do this, they are laid out in one row on the floor in a fairly dry room for 1-2 weeks.
To further speed up the germination process, use the heating method.The tubers are laid out in small boxes or nets and installed in a dry room. The air temperature is gradually raised to 30 degrees.
There is another effective sprouting method, however, it is quite laborious, so not everyone has the patience to complete it. In each tuber we do it carefully so as not to hurt the eyes, an incision. We put the potatoes prepared in this way in boxes, shifting them with sawdust or straw.


We store the boxes in the cellar, but it should be dry and cool.
This method allows not only to save planting material, but also to accelerate germination, since when cut, the tuber produces a stress hormone. Because of this hormone, the process of tissue regeneration is accelerated and roots form faster. Before planting, potatoes can be divided into pieces along existing cuts. This method allows you to increase the yield by more than 30%.


The seedling method is perhaps the most effective, allowing you to get an early harvest. We plant the cooked potatoes in pots, bags or boxes filled with soil or humus, transfer them to a greenhouse or greenhouse. After the emergence of shoots, we plant in open ground.
The combined method combines the method of germination in the light and in the ground. First, the potatoes are kept in a bright place until small sprouts form from 2 to 3 weeks. Then the tubers are placed in a container with moist soil in layers. Next, you need to moisten the layers as in the "in boxes" method. This germination method will take up to 40 days.


Common mistakes
Using unsprouted planting material, you risk getting an inferior crop, infecting the ground. When planting potatoes without sprouts, you do not know if it will sprout. It will be a shame to spend time and energy and end up with a half-empty garden bed.It is better to take the time to germinate the tubers with any of the above methods, choosing the option that is acceptable to you, and in the end enjoy the harvest.
A potato that has not risen within a month will not rise again. This is due to:
- insufficient quality potatoes were used at planting (when sprouting this could have been avoided);
- the wrong variety is used or it is not suitable for your region;
- infected, disease-weakened tubers;
- there was a bear attack on the seedlings, which could have been avoided by treating the tubers before planting with a special agent or the ground two weeks before planting.

Secrets of a Good Harvest
Before planting, it is desirable to treat the land with a complex mineral fertilizer. With a small amount of planting material, it must be placed in fertilizer for several hours and dried before planting.
If there is a lot of planting material, it is easier to spray it with fertilizer once a week during the entire germination period. To improve germination and increase yield, the day before planting, treat with a growth stimulator.
Mulching beds with planted potatoes will help retain moisture in the soil and avoid loosening.
Effective soaking for 0.5 days of planting material in a solution of garlic, twisted in a meat grinder and diluted in water at the rate of 1 kg per 10 liters of ordinary water. By processing tubers in such a solution, you will increase the yield by 1.5 times.
Combine methods during germination. The combination of methods "in the light" and in the ground allows you to grow a crop 2 weeks earlier.


When planting potatoes in the ground, consider the climatic conditions and soil. Potatoes are planted on the "comb" in Siberia and in wet areas, while small depressions are made in them, immediately applying fertilizers.During the growth period, hilling is carried out, powdering the earth to the bush.
With a lack of moisture on peat and sandy soil, the method of planting in trenches is used, digging a ditch 10 cm deep and immediately applying fertilizer. After planting, the pits are covered with earth and the bed is mulched.
The method of planting potatoes under straw saves time and energy. Planting material is laid on undigged soil, covered with straw with a layer of 40 to 50 cm. The method can be improved: peat is laid on the ground, and preferably humus, sprinkled with fertilizer, and tubers are laid out on it at the right distance. Only then are they covered with straw. To prevent it from being blown away by the wind, they cover it with boards from above. You don’t need to weed such a bed, you don’t need to loosen it, occasionally you just need to water it if you have an arid climate zone. Harvesting is a pleasure: it is enough to rake the straw and get clean tubers.
It is only important to ensure that pests do not settle in the straw. It can be used next year, if carefully collected and carefully stored, preventing decay.


For information on how to select and germinate potato tubers, see the following video.


